Hello @staffanlandin
Have been ruminating about your requests for editing and parent~child slide relationships in Hype ("Feature Requests - Improved Slide Management") and have come up with a conceptual approach that might prove of use in the current version of Hype.
Hype slide trial.hype.zip (24.6 KB)
Section 1 of this post describes the bare bones conceptual mechanism in the Demo “Hype slide trial.hype” - it is not a finished project just the germ of an idea. There are three functions and some code in the “Head HTML”. This code is thoroughly annotated (in fact more annotation than code).
Section 2 delves into some optional ideas of how to implement the set-up ~ first draft editing of images using this approach. These ideas might read long, but in practice are very straight forward and fast.
Note: I use rectangles place of images in the Demo.
============================================
Section 1 - Concept
I have done several slide shows in the past but they have been timeline based (i.e. a “filmstrip”) and there was no need for sorting images as the people for whom I did the slide shows had the images already sequenced.
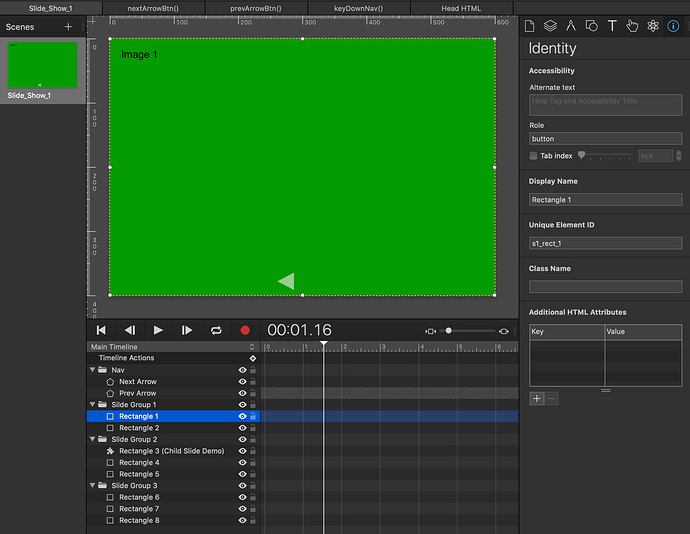
So > instead of using the linear “filmstrip” style of a timeline based presentation > how about a "deck of cards" approach? (Please see FIG.1 below as reference for some of the following).
With the “deck” approach You can edit the order of the slide presentation (while viewing the images) via the Timeline layers by just simply dragging up and down an an individual layer - no Timeline adjustments involved.
The Set-up:
The starting state of the images~Groups in this deck are all on the stage (“Left Placement” set to “0” pixels) - the first image visible.
Then, with the click of the left arrowkey - on screen or the keyboard - the image being currently viewed would slide to the left off stage onto the “previous” stack and the next card in order would be shown on the stage. There are arrowkeys to go back to view previous slides as well of course.
You can use different transition set-ups, this is just one example.
I’m not sure I fully grasp your intent with child slides but I am assuming here that we will want the option to view a sub-set of images relating to a particular (parent) slide. For this Parent~Child operation I chose to use a Symbol and have the images on a timeline (i.e. the filmstrip approach) with additional separate navigation to differentiate this Parent~Child arrangement from the main slide navigation. Please see the Symbol “Rectangle 3” in “Slide Group 2” in the Demo. I did not implement up/down keyboard arrow navigation here.
Once the editing is finalized You will need to create an ID for each image. This process can go very fast once the basic nomenclature is established and copied (e.g. “s1_rect_1”) & the “Identity Inspector” panel open:
Click the “Unique Element ID” field, paste nomenclature, backspace delete the last numeric character(s), type new sequential number, selected the next image in the Timeline layers (with element selected in the layers > keyboard arrowkey up or down).
Lather, rinse, repeat.
The only time You need to wade into the code is to insert the total number of images in the presentation into the global variable “imageTotal” (“Head HTML” tab):
<script>
     window.currImage = 's1_rect_1'; //current image (ID) being viewed
     window.imageTotal = 8; // total number of images in the presentation
     window.imageNum = 1; //starting image number
</script>
Also, You may wish to adjust the nomenclature to your preference for the “currImage” global variable which is used for the “Unique Element ID” field for each image.
The current break down: “s1” refers to the Scene the slide show is in; “rect” is a general descriptor of the element (could be “img”, etc.); the last character is the element’s sequential number in the layers.
The underscore character is used to select parts of the element's ID. In this Demo just the last character (numeric) is targeted by the code (after the second”_”).
Note: The code is expecting two underscores in the ID - so don’t break its heart. You can read more about the Javascript “split” method employed here.
Another NOTE:
My first plan was to use Javascript to target specific child nodes (e.g. “document.querySelector(#parent :nth child(2)”) in the DOM and so skip the ID step (or any other data entry for a particular image, trying to save a step), the exception being giving an ID to a Group folder; but a brief exploration of this approach did not yield results.
My thought was the Group ID (the parent) would allow for the selection of its individual child nodes (the images) for manipulation. These child nodes presumably relating to the layer order in Hype’s Timeline layers. Again, the goal was to avoid entering identifier data for each image and have a more automated process.
(@jonathan any ideas/comments - or was I fishing in the wrong pond?)
FIG.1 - The editing environment of this Demo (no utilization of a timeline except in the Symbol “Rectangle 3 (Child Demo)” ).
=============================
Section 2 - “Serving Suggestions”
If You have more than 30 slides or so, a rough sort into bite size chunks would be extremely useful before bringing the images into Hype. One option is to do this operation in the Mac’s Finder. (Of course one could also use software dedicated to this process!)
I would suggest sorting these images into groups, either because of a clear demarcation of the subject matter (such as rooms in a house tour) or arbitrary convenience of group size - ten images, or whatever.
With the images for the slide show in a folder in the Finder > select the top image’s icon in this folder > hit the space bar. A “Quick Look” preview will appear. In the Finder: right click on this file and select a tag (color) for that image.
The idea is these color tags will be assigned according to the desired grouping of images... e.g. Home Tour example > all the exterior shots of the property will be green; interior downstairs images will receive a blue tag and so on.
Repeat this procedure for all the rest of the images.
Note: You do not have to leave folder containing the images in the Finder while doing this procedure. The keyboard’s down or up arrow will select the next file for a “Quick Look” preview and a right mouse click on the file will open the pane to select the tag colors.
Also, when You are done tagging all the files You can set the sorting of the folder in the Finder to be by Tag (color) making it easy for the next step.
Once You’ve tagged the image files in the Finder drag similarly demarcated color tagged image files from the folder into Hype and then immediately group these files for the fine-tuning sort.
By using Groups in this fashion You can turn on/off the visibility of other images or Groups by clicking on the “Visibility” icon (the Eye) on the individual Timeline layer making it easy to focus on the desired images in a specific group.
Takes no time to go through a large batch of images in this fashion.
Other than just the organizational convenience of creating groups it would also simplify the coding if You wanted the grouping option to create navigation (e.g. buttons) that quickly went to specific areas of the presentation. Using a “House Tour” again as a model there could be buttons that went to the first image in an “Exterior” grouping, “Interior 1st Floor”, “Interior 2nd Floor”, etc. so the viewer does not have to plow through images they might not want to see or have already visited. This navigational feature is not implemented in the Demo.
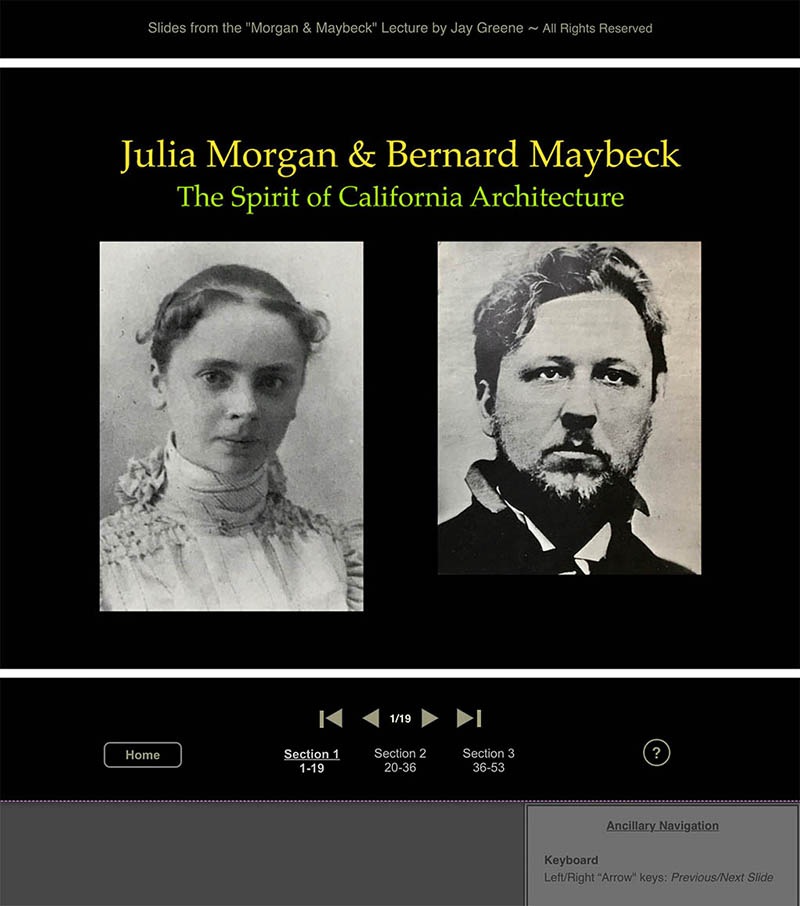
A more fully fledged example of a possible navigation interface is shown in FIG.2 below. This example was done using timelines but could be done using the above “deck of cards” concept as well.

