¡Ola Amigos!
Attached is “Machinery 4.hype.zip” which is a timeline only version of Hype documents from this thread.
(Note: Hype Pro required for the foregoing. If You do not have the Pro version it is a highly recommended upgrade.)
The “Machinery 4.hype” file uses only timelines to achieve the same look as those files in the thread linked to above; of course one could do a lot more with the code version if desired, but the effect as presented is: The clicking of the (4) different buttons rotates the gears which open/close the diaphragm in relationship to the rotating gears. (Please see Fig.1 below - static image.)
Fig.1

Attached are:
1) The @MarkHunte version of the presentation (a code condensed version of the OP’s Hype project).
machinery_mhv1.hype.zip (1.3 MB)
2) My timeline only version (no code or even timeline actions, additional HTML attributes, etc.).
Machinery 4.hype.zip (1.3 MB)
Open both and compare the look. You will see that the overall effect is very similar - though Mark takes a different meaning for the “Less Open” state, I could have matched that too but chose to have my own interpretation. Also Mark, as per the OP's set-up, has the buttons outside of the Symbol "machine". I preferred to put them inside the Symbol for my version; also I have obviously changed the background to make comparisons less confusing.
The key to the timeline only version is that they all use “relative timelines” - a very useful feature in Hype’s toolbox.
Before going on about the set-up for "Machinery 4" You will need to be fully conversant with how timelines work. Please click here for the documentation regarding this topic.
The Set-up:
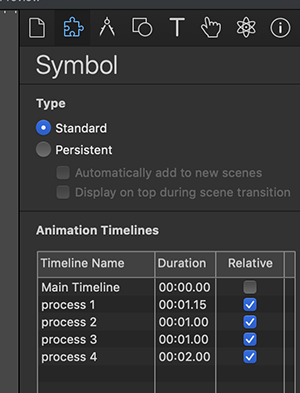
Open the “machine” Symbol. Look at the “Symbol Inspector” and note there are 4 timelines each corresponding to a particular button which when clicked runs the timeline. Note also that each timeline has “Relative” checked (Please see Fig. 2). Each timeline contains the properties/values for individual elements in the “machine” Symbol.
Fig.2
The action for each button is set-up as follows (matching the corresponding timeline it represents):
Fig.3
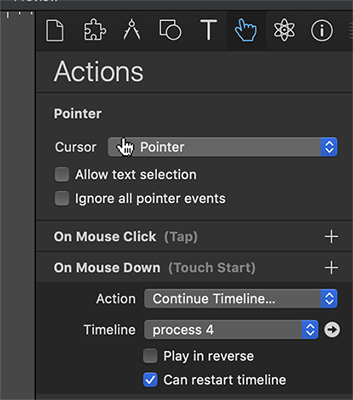
Note the selection of “Continue Timeline” and “Can restart timeline” checkbox.
Additionally, here are three simple ways to adjust the timing of the gears and other components for an individual timeline:
- Adjust the length of the timeline.
- Adjust the values in the timeline.
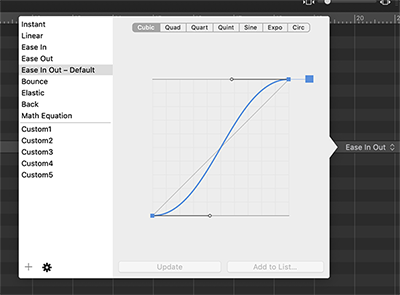
- Adjust the timing functions of the timeline (please see Fig.4, and also here for more info about timing functions).
... or some combination of those three.
Fig.4
This whole set-up took me less than ten minutes (as I duplicated timelines) - but a lot longer to explain. ![]()
I would like to emphasize that while no coding is used in my example here - having a basic grasp of JavaScript, combined with a solid understanding of Hype’s own feature set will really open up the possibilities for your Hype projects. One does not need to be a JavaScript master to reap the benefits of this “hybrid” approach. Along this line in the near future I will be posting in this thread an example of using just one timeline combined with a “wee bit” of basic code for this project. This arrangement makes for not only a more compact set-up, but also one with more options in the presentation.