The current selection of cursors is pretty slim. It would be great if you could support custom CSS cursors.
Something like this plugin would be very useful: jquery-awesome-cursors
The current selection of cursors is pretty slim. It would be great if you could support custom CSS cursors.
Something like this plugin would be very useful: jquery-awesome-cursors
You can use css in the HTML Header to achieve this.
#box {
cursor: url(${resourcesFolderName}/my.png), auto !important;
}
put the picture file in your Hype resources section
Darn Greg beat me to it… 
customCursor.hype.zip (35.7 KB)
Thanks, @gasspence & @MarkHunte. Both these approaches worked for me.
It would still be nice if a wider range of CSS cursors were available within Hype. Even if it is only the standard ones.
One thing I did notice was that these external CSS styles only work on elements where the cursor selection had never been altered. Once I changed this selection, Hype seen to add some behind the scenes styling that overrode anything I did subsequently, even if I just changed the setting straight back to “automatic”.
By way of example, here is @MarkHunte’s example file that worked fine until I briefly changed the cursor selection. Even though it is changed back now, the external CSS styling no longer works.
customCursorRuined.hype.zip (21.8 KB)
If you'll change Mark's css to this, it should stick...
.customC {
cursor: url('green.png'), default !important;
}
I added '!important' before the semicolon
Agreed @gasspence - the external CSS “!important” is probably able to override Hype’s change, which is likely another “!important”.
I tried using “!important” and didn’t get any results.
Has anyone else tried this with any success?
This is the correct way to do it; if you’re still running into issues feel free to post the code/project you are using.
Thanks for the response, knowing that the problem was on my end made me go back and work it out. Turns out I was just confused about the best way to link CSS files with Hype.
“!important” worked as intended. 
Thanks for all the information about this. I’ve managed to make a custom cursor which is activated when an element is hovered over. It works fine in the browser preview, but not when I’ve uploaded the Hype animation to my self-hosted Wordpress site ( using Filezilla). I’m assuming this means there’s a problem with how I’ve added the url to this code
.customC {
cursor: url(‘green.png’), default !important;
}
This is my first ever piece of CSS code and the answer might well be staring me in the face, but I’m struggling. I’d really appreciate it if someone could walk me through what I need to do to find the correct url and add it to the code.
If you place green.png in the Resource Library, you can access by prepending this variable in front of it:
${resourcesFolderName}
So your CSS would look like
cursor: url('${resourcesFolderName}/green.png'), default !important;
It looks like you have 'smart quotes' in your CSS, so also make sure that you remove those. CSS only works with regular quotes: '...'
You would place the CSS in the <head> area. You can edit the contents of the <head>…</head> of your exported .html file by clicking on 'Edit HTML Head' in the Document Inspector.
Thanks Daniel, but I’m afraid I’m now more confused than I was before. I’m wondering If I just don’t have the skills to understand this. I tried making a new CSS file with Brackets and adding it to the Resource library using the CSS you suggested but changing resourcesFolderName to the actual name of the folder containing the animation to be uploaded
cursor: url(’${resourcesbiker}/green.png’), default !important;
that didn’t work, so I also tried simply copying the code you posted and now I’m not seeing the custom cursor when I preview the animation, whichever code I use
Also I can see the CSS in the head area but it will not let me edit it
I’m also confused about the url, I was assuming that it would start with http and I don’t know what the $ sign is for
(I also don’t know what a smart quote is and googling hasn’t helped. The code in my question was just copied from further up this page.)
I’m sorry that this all sounds muddled, but I’m a beginner with code and am really baffled now.
You don’t need to add a CSS file to hype, you can set CSS in the ‘head’ area. You can edit the contents of the <head>…</head> of your exported .html file by clicking on ‘Edit HTML Head’ in the Document Inspector.
Just add:
<style>
...
</style>
And you can set your own CSS which will be exported to your Hype document’s .HTML file.
This also shows a cursor in action: Change mouse cursor on rollover or use a custom image for cursor
Here’s a demo document to see a coupe methods. The first scene is the method I think you should use. The second scene is with a remote cursor loaded from a URL.
CustomCursor.hype 2.zip (79.8 KB)
Thanks Daniel. I made a test file using your example and that’s a lot easier than the method I used before, but I’m having the same problem. I uploaded my file to Wordpress and I’m not getting the custom cursor. I tested both an html5 folder and an OAM file ( on different pages). The animation works, so I’m sure the upload is fine.
Next I tried the same thing using your Hype file. Again, no cursor. Any ideas? If it helps I’m using the “Tar” theme and a Blank Slate plugin. I’ve uploaded a number of other animations to my site ( they have the standard “hand” cursor on hover) and they are all fine.
Also a secondary question. I have several scenes in my animation and need an element on each scene to show the custom cursor, so using a “unique element ID” setting won’t work for them all. Is there an alternative way? When I was using the CSS file, I set a Class Name on each element, but I don’t know how to adjust the code for that using your method.
Thanks for all your help, I really appreciate you taking the time.
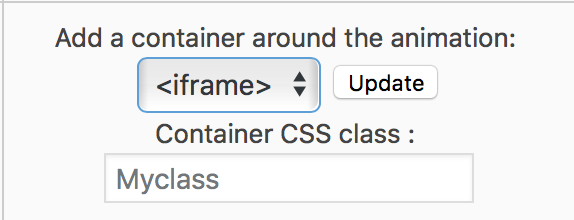
Well this is because the plugin doesn't load the actual HTML page (which contains your CSS), it loads code directly from the JavaScript exported by Hype. So the CSS defining our cursor is not included. To fix this, change the embed method to 'iframe'
The cursor will need some sort of element under it which tells your browser 'show this cursor' -- so one option is to use a 0% opacity rectangle underneath everything and set either a class name or ID. If you're using a class name, it would be:
.classname {cursor: url('${resourcesFolderName}/green.png'), default !important;}
For an ID:
#myelementID {cursor: url('${resourcesFolderName}/green.png'), default !important;}
You can have multiple elements with the same class, but you shouldn't have multiple elements with the same ID. So if you have the same cursor on scene 1 and 3, you could use something like .classnamescene1and3
It all makes sense now. Can you suggest an alternative to using a Wordpress theme with a Blank Slate plugin? The only reason I did that was because I wanted to make a site that consists of just Hype animations on blank pages and spent a lot of time trying to figure it out, but got nowhere with any of the Wordpress themes. A friend recommended I try the plugin. It works, but it seems like a messy way to get the job done.
I’ve used the classname method you suggest for the elements and it’s working well. Thanks for that.
Sorry, don't have a lot of experience with that sort of thing. What type of site are you trying to create? What the plugin essentially does is creates a theme file with the bare minimum content, where only the post content is created. You can essentially do this yourself by creating a blank page template. Name this as page-blank.php and place it in your active Theme's folder.
<?php
/*
Template Name: Blank Page
*/
?>
<?php get_header(); ?>

        <?php if ( have_posts() ) : while ( have_posts() ) : the_post(); ?>

<?php get_footer(); ?>
I’m trying to make a site that looks like this one. Blank page with Hype animation and nothing else. ( I found this via the Hype Gallery) http://www.maisonsonique.nl/hype/kokeshi/index.html
This is exported straight from Hype – no Wordpress necessary.
Once you have a regular web host, here’s how you would upload your document to it: Video tutorial: Uploading your Tumult Hype document to a Web Server and Embedding Within Another HTML Page
Hi Daniel,
just one last question (getting late here and I’m starting to feel bad about bugging you).
When you say “no Wordpress necessary”, what do you mean?
I already have a regular web host and have been uploading animations to a self-hosted Wordpress site using Filezilla.
I’m an artist with no experience in website building or programming and was under the impression that using Wordpress as a content management system ( or website builder) was a sensible option. Am I wrong about that?
All the best
Jackie (Jak)