Hype Reactive Content

↑ look at project
1.1.9 Added processValueInScope to streamline the code Added data-effect to trigger code on reactive content changes Fixed a slight regression in the visibility handling Reworked the IDE highlighting to be more robust and include effect

  • Added processValueInScope to streamline the code
  • Added data-effect to trigger code on reactive content changes
  • Fixed a slight regression in the visibility handling
  • Reworked the IDE highlighting to be more robust and include effect

Always dotted lines… Please let me know what you think.

Version 1.1.9 introduced data-effect

The data-effect attribute introduces dynamic behaviours based on changes in the reactive data model. It executes the JavaScript code contained in its value every time any data changes occur.

In contrast, the data-content attribute is used to dynamically control the content of the HTML element. The value of data-content is a JavaScript expression that is evaluated, and the result is set as the inner HTML of the element. When the reactive data changes, the expression is re-evaluated and the content of the element is updated.

data-visibility attribute is used to control the visibility of the HTML element based on the value of a JavaScript expression. If the expression evaluates to truthy, the element's visibility is set to visible; otherwise, it is set to hidden. This check is re-run whenever the reactive data changes.

In summary, while data-content and data-visibility attributes affect an element's content and visibility respectively, data-effect executes custom code, enabling more complex dynamic behaviours.


Possible conceptual uses for the data-effect attribute in the context of Tumult Hype, here are a few possibilities:

  1. Dynamic Animation Triggering: data-effect can be used to trigger different animations based on user interactions or application state changes. For instance, clicking a button could initiate a bounce effect on an image, or achieving a particular score might trigger a celebratory confetti effect.

  2. Element Transformations: Depending on the user's actions, data-effect can transform HTML elements. It could enlarge text, rotate an image, or morph one shape into another.

  3. Interactive Storytelling: In an interactive story or game, data-effect could be used to apply effects that enhance the narrative, such as fading the screen to black at a suspenseful moment, or creating a shimmering effect on a magical item.

  4. Conditional Styling: data-effect can also be used for conditional styling, altering the appearance of elements based on certain conditions. For instance, when a user hovers over a button, the element could change color, opacity, border, etc.

  5. Progress Indications: For elements representing progress, like a loading bar or a quiz score meter, data-effect could be used to animate these elements. The fill could animate from left to right to visually represent progress over time.

  6. Feedback Mechanisms: data-effect can be used to provide visual feedback for user actions. For instance, a successful form submission could trigger a green checkmark to appear.

  7. State Transitions: You can use data-effect to visually depict changes in state. For example, a switch being toggled could animate from one position to another.

  8. Hover Effects: data-effect can apply different hover effects on an element. This could involve scaling the element up or changing its color.

  9. Interactive Infographics: In an infographic, data-effect can animate data visualizations. For example, bar graphs or pie charts can animate to represent changing data.

  10. Image Galleries: In an image gallery, data-effect can create slide-in, fade, or 3D flip effects when transitioning between images.

4 Likes

↑ look at project

1.2.0

  • Fixed regressions in highlighting in the IDE

1.2.1

  • Added hypeDocument.customDataUpdate on Hype document basis
  • Fixed minor misses in the IDE highlighting for effect

Visibility Tutorial in Hype Reactive Content

CSS Visibility Properties and Mechanisms

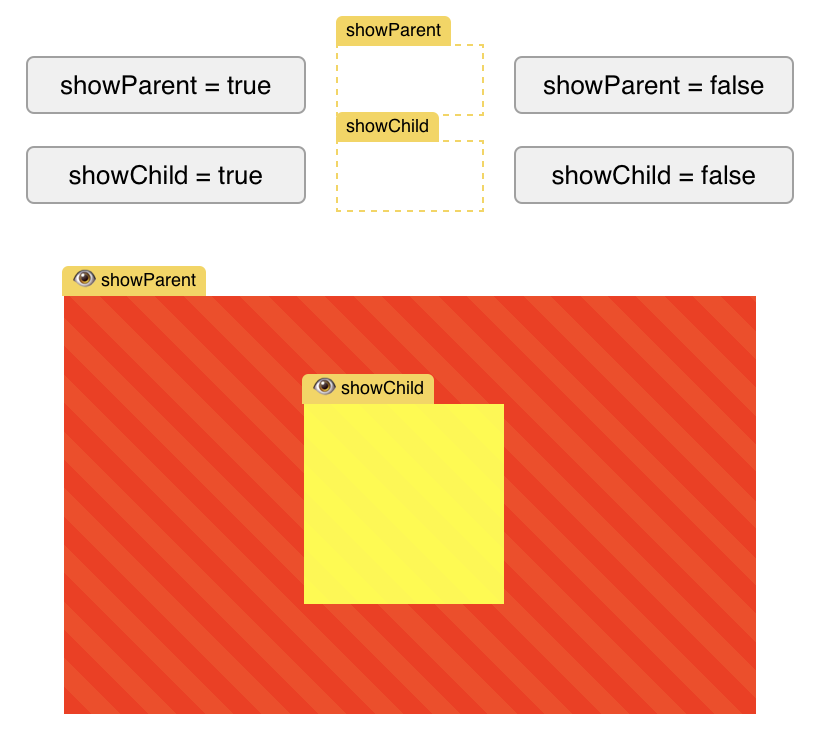
The CSS visibility property recognizes two states: 'visible' and 'hidden'. An element with the visibility: visible; property is displayed fully, while the visibility: hidden; property renders the element invisible while preserving its space in the layout grid. In the context of hierarchical elements, a visible child element remains so, even if its parent element is set to hidden.

Expression Linkage for Nested Visibility Control

In reactive content platforms like Hype Reactive Content, nested element visibility can present challenges. If a child element is designated as visible, it remains so, even if its parent element is hidden. To address this, the data-visibility property expression is used. Through chained expressions, conditions such as showParent && showChild can be formulated, ensuring the child element is displayed only when conditions for both parent and child are met.

CSS-Only Approach for Nested Visibility

The CSS rule [style*="visibility: hidden"] .inheritVisibility { visibility: hidden !important; } can be employed for managing nested visibility. This rule targets elements with inline visibility: hidden declarations, causing child elements with the .inheritVisibility class to adopt the hidden state. This approach offers a CSS-based solution without necessitating JavaScript linkages and maintains uniform visibility behavior across nested structures.

Propagating visibility using CSS

This rule.propagateVisibility[style*="visibility: hidden"] [data-visibility] { visibility: hidden !important; } imposes a more definitive behavior. Any child element with the [data-visibility] attribute will be hidden if its parent has the visibility: hidden style, regardless of their original visibility setting. This means all matched child elements are forced to adhere, providing less individual control.

Interactive Tutorial:

manageVisibility.hype.zip (425,7 KB)

4 Likes

↑ look at project

1.2.2

  • Tweaked color highlighting in the IDE to color unscoped items in scopes correctly
1 Like

The CSS rule

[style*="visibility: hidden"] .inheritVisibility { visibility: hidden !important; }

targets child elements with the .inheritVisibility class, making them hidden when their parent has an inline visibility: hidden declaration. This approach gives more flexibility since only children with this specific class are affected.

In contrast, this new rule

.propagateVisibility[style*="visibility: hidden"] [data-visibility] { visibility: hidden !important; }

imposes a more definitive behavior. Any child element with the [data-visibility] attribute will be hidden if its parent has the visibility: hidden style, regardless of their original visibility setting. This means all matched child elements are forced to adhere, providing less individual control.

I updated the above example as well.

Both rules avoid the need for JavaScript but offer different levels of specificity: one giving more control to individual child elements and the other asserting a broader, more blanket approach.

Sweetening Up Reactivity in Hype's customData

Did you ever feel like things got a little messy when reassigning Hype's customData? Well, those days are behind us!

Previously, if you tried:

hypeDocument.customData = {
    chocolate: "dark",
    gummyBear: "red"
};

You'd inadvertently lose the reactivity magic.

The workaround was something like:

// The old technique
Object.assign(hypeDocument.customData, {chocolate: "milk", jellyBean: "blue"});

The Refreshing Update

Here's the good news! I've sprinkled some improvements, so now you can update your customData like this without any hiccups:

hypeDocument.customData = {
    candyCane: "peppermint",
    lollipop: "cherry"
    // ... and so on
};

Indeed, with a nifty getter/setter now in place for the customData property, it ensures that all reactive behaviors stay active, no matter how you shuffle things around.

Refilling customData (and managing state in Hype's documents) has never been this seamless!

Before I finalize these changes on GitHub, I'd love for you to test it out and share your thoughts. Let's make sure everything's spot-on for everyone. Dive into the code, try it out, and let me know your feedback if something breaks for you.

HypeReactiveContent-13.hype.zip (85,4 KB)
2 Likes