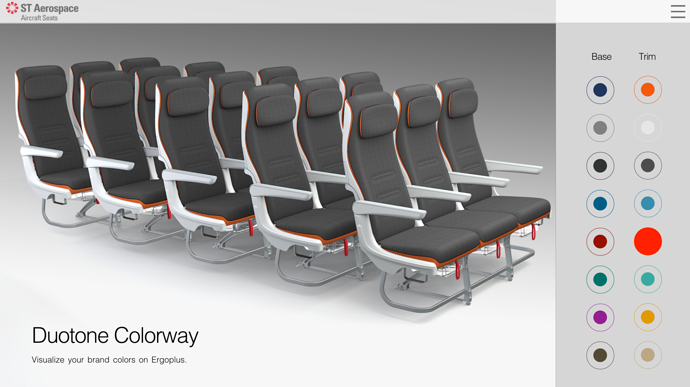
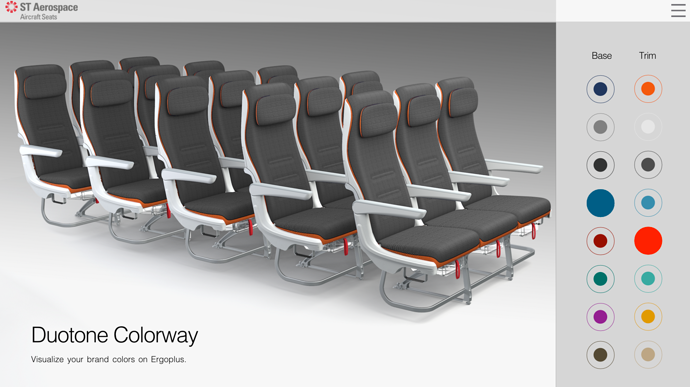
Button changed when pressed and stays that way until other button is pressed (Color Picker)

Hi,

So, I’m having difficulty on grasping my logic on this. I have around 16 colors as buttons that I want to animate. Once 1 color button is pressed, the button will change into a sort of chosen mode (from small circle with outer ring >> full circle) and it should go back to its original state when other color is chosen.

I applied the same method from the toggle template from the tutorials page but it doesn’t work?

So I tried making the elements as buttons and fill in the background with image and changed the pressed section to the image that I want it to be. But it seems the button doesn’t stay that way once clicked.

Here is the working file:
Presentation_Tumult.zip (1.9 MB)

Does this need javascript?

Thanks for the help!

Victoria

hi @victoriajung

Is this what you were needing?

live version

if so, let me know and I can give you the document for you to look at.

It doesn’t rely on png’s it uses hype built in colors.

Also, it uses timelines for the animations and javascript to set the color of the rectangles.

@DBear,
I think he also wants the click button to stay expanded to indicate the current chosen colour until another button is clicked.

Hi @DBear

It’s close but I was thinking that when the button are selected they remain full color instead of going back to little circle with the outer ring.

Is that possible?

I had to do this on version 2.5,

So cannot use things like classes and other good stuff in v3.5, also this is just off the top of my head of how I would do it using JS. (until I refined it)

buttons.hype.zip (11.5 KB)

Here is a revised version.

Here I am trying to make it easy to construct your scene.

The Construction of this Example:

You create you First Button. A Inner Ellipse and an Outer Ellipse.

Give the Inner Ellipse an unique id. What ever you want. Then give its the class name : InnerEllipse.

The Class Name I have named above will be used in the Javascript Functions. So MUST be the same.

Group the two Ellipse.

We group the because apart from being easier to work with, doing so means the Ellipse position will be relative to the Group. Rather than the Scene/window.

( Don’t create any more buttons yet)


We then Add a Javascript Function to Inner Ellipse’s MouseOver, MouseOut and MouseClick Actions.
We will use the same Javascript Function for all three actions. ( Code to come below )


Now go to the Scene and the Button Group you created before.

Select the Group and Duplicate it as many time as you need.

For Each duplicate, Change the background colour, Give it a Unique ID.

All the duplicates should already have the class name and the mouse actions


Lastly on the Scene we add a Single Rectangle that will take the colour chosen. Give the Rectangle the ID of : Box


Now back to the Javascript into the Function:

Paste ( I know you are not going to type it :smile: ) this code in to the function.

The code takes care of all the Animations, shrinking/ expanding of the buttons Inner ellipse , Changing the Colour of the Box and storing which button is the clicked one and therefor leaving it alone.

The code is commented so you can follow along.

	var box =hypeDocument.getElementById('box'); //-- Colouring Box
	
	var EllipseButtons =document.getElementsByClassName('InnerEllipse');  //-- Array of the buttons inner Ellipse by class Name
	
	var ellipseButtonID =   element.id //-- The buttonthat triggered this Function


	 //** --ELEMENT  MOUSEOVER / MOUSEOUT ACTIONS
	 
	if (event.type == "mouseover"  && window.buttonClicked !=ellipseButtonID ){ //--- only if this is not the last clicked button
	 	
	expandSize(element) //-- exapand button animation
	 
	
	}else if  ( event.type == "mouseout" && window.buttonClicked !=ellipseButtonID){ //--- only if this is not the last clicked button
	
	
	shrinkSize(element) //-- shrinkbutton animation
	 
	 
	}
	
	 //** --ELEMENT CLICK  ACTION
	if (event.type == "mouseup"  ){
	 window.buttonClicked = ellipseButtonID; //-- STORE THIS AS THE LAST BUTTON CLICKED


	for (i=0; i < EllipseButtons.length;i++ ){
	//-- ITERATE OVER ALL THE BUTTONS USING THE ARRAY (OBTAINED ABOVE BY CLASS NAME)
	
	var buttonID = EllipseButtons[i].id
	
	
	if (buttonID != window.buttonClicked  ) { 
	//-- SHRINK ALL BUTTONS THAT ARE NOT THE CLICKED ONE

	
	shrinkSize(EllipseButtons[i])
					}
	
				}

 hypeDocument.getElementById('box').style.backgroundColor = element.style.backgroundColor;
	
	
	}
	
	
function shrinkSize(thisElement){
      //-- SMALL BUTTON DISPLAY
    hypeDocument.setElementProperty(thisElement, 'left', 11, 0.4, 'easeinout')
    hypeDocument.setElementProperty(thisElement, 'top', 11, 0.4, 'easeinout')
    hypeDocument.setElementProperty(thisElement, 'width', 22 , 0.4, 'easeinout')
    hypeDocument.setElementProperty(thisElement, 'height', 22 , 0.4, 'easeinout')
    
    
}

function expandSize(thisElement){
 
  //-- LARGE BUTTON DISPLAY
    hypeDocument.setElementProperty(thisElement, 'left', 0, 0.4, 'easeinout')
    hypeDocument.setElementProperty(thisElement, 'top', 0, 0.4, 'easeinout')
    hypeDocument.setElementProperty(thisElement, 'width', 45, 0.4, 'easeinout')
    hypeDocument.setElementProperty(thisElement, 'height', 45, 0.4, 'easeinout')
    
    
}

The last thing we do is place this code into the Head file.

<script>
	window.buttonClicked = "";
</script>

This is the Global Var that will hold which button was clicked last.


Hopefully this will make the construction painless. Because as much as I love the timelines I never like to create tons of them for individual elements.


Notes:

The Shrink and Expand sizes are hard coded. I originally used the sizes from the elements theirselves but found this could become unreliable if you moused over too fast. The Variable that stored it would get a wrong number.


The example File:
Buttons_On_Off.hypetemplate.zip (18.1 KB)

1 Like

Just updated the last post. (again)

Hi Mark!

Oh god thank you for the detailed instructions! This is exactly what I have in mind!

I just started learning javascript yesterday so I will try this and follow along, hope I don’t get lost. I will let you know if I bumped into any wall!

This could easily be done with a little bit of jquery and CSS. Here is an example I made for you: https://jsfiddle.net/asua7xqk/1/

It might be hard to understand the jquery-library at first sight but the code is very easy to read and will be good when toggling classes.

Hey @markus, Good thought on the class change, I often use it.
The css you have at the moment would probably need some work I think to match the indiviidual colours and correct colours to the buttons …

@MarkHunte Of course, I kept it simple to avoid confusion :smile:

1 Like

GUYS,

after troubleshooting for a week, they work!

So silly of me, but in order for the buttons to work is to make sure the numbers of their placement and sizing reflect correctly on their javascript code (the one with easeinout part).

I have simple ideas in mind :smile:

I was thinking: since the color selection is separated into 2 groups (base and trim) — is it possible to keep the buttons on both the base and trim expanded if they are chosen on their respective categories.

Right now what we have is the button will shrink if other button is pressed. What if I want them to shrink only if the color from the same category is pressed. So people will know which color they are seeing on both base and trim category.

This is what’s happening now:

This is what I have in mind:

Any ideas?

What you describe is how the last buttons I posted should already work.

Remember the only reason I used JS for them was to cut down on the number of timelines and their coordination.

You can if you want create a timeline for each button.
Then use the same method I showed in the PM for the fixing the colour issues you had (Base & trims), which is to have another timeline that resets all the relevant timelines to their default.
You could probably just use a continue timeline action to run the other times back in reverse.

You would have two of the latter, one for trims and one for base.

Then the on click action for the buttons would run one of the reset timelines and then the start timeline for the button.

I’m sorry, I thought I shared my project earlier.

This should solve your problems!

colorPicker.hype.zip (24.2 KB)

Nice,

If you give the base buttons the class name of “Base” , you could probably change the switch an if clause to :

if (element.className.split(" ")[1] == "Base") {
	 base.style.backgroundColor = element.style.backgroundColor;
			prevBaseSelected = baseSelected;
			hypeDocument.continueTimelineNamed(prevBaseSelected, hypeDocument.kDirectionReverse, false)
			baseSelected = element.id;
	 }else {
	 
	 trim.style.backgroundColor = element.style.backgroundColor;
			prevTrimSelected = trimSelected;
			hypeDocument.continueTimelineNamed(prevTrimSelected, hypeDocument.kDirectionReverse, false)
			trimSelected = element.id;
	 
	 } 

Note since I use else rather than else if the trims class name is not that important.

Always room for improvement Mark :wink: I left it this way a) didn’t want to spend too much time on it and b) it’s easier sometimes to see what’s happening when using a switch

@victoriajung

from both of these examples you should be able to get what you need :wink:

@MarkHunte
I’m just wondering though that if you are only assigning a class name of Base. How can you distinguish between Base and Trim. I mean if you select a Base Color and a Trim color will they both stay in their selected state or will you only have 1 button in a selected state?

Very true. Especially the way I sometimes code :smiley:

Hey Mark,

I think the one that you gave me, only had 1 box changing color. Therefore the button change everytime another button is pressed. @DBear method is on point but that means I need to set another timelines for the button.

So, is there another way that I can do small tweak like differentiating class name of the base and trim and add some codes to the js?

I am assuming you mean my first example.
All examples I gave you do what you want. But you have to set them up right ?.
The first example that saved on timelines for the buttons, was set up for a single set of buttons.
All you needed to do is duplicate that set up for the other buttons.

If I am honest there is no point showing more and more methods if we do not know what you are doing that is stopping the ones we are showing you from working.. :confounded:

But because I am a nice guy I have PM''d you an example using the originally you sent me regarding the image swaps which I fixed already for you.

I have replaced the buttons which you had ( images in buttons) to the contrived type of buttons we have been using on this thread.

All actions are run from the inner ellipses .

All inner ellipses base have a unique id and the classname baseButton

All inner ellipses trim have a unique id and the classname trimButton

The Javascript is only to deal with the buttons. The Colour change is still using the same actions we discussed in the PM.

There are two javascript functions.

The base buttons run one. The trims run the other.
I am not really sure that the stuff you sent me by PM was really needed to be kept in PM as you have posted here images of what you are doing already but since thats where you sent it, thats where I have to post the example since I am using that in the example. But it does make this thread a bit confusing ...

Hi @victoriajung

Here is a my adapted version of the previous document taking away the need for timelines and just using CSS selectors and the scaleX and Scale Y properties

You’re welcome. Invoice is in the post :smile: :wink:

colorPickerv2.hype.zip (22.7 KB)