Tool tip that follows mouse

Hi,
I’m try to create a tool tip that follows the coordinates of the mouse on hover. I’m using this simple javascript. However, it doesn’t seem to be working properly in Hype. The tool tip shows up pretty far away from the curser and doesn’t follow it. I have seen this script work out side of Hype so I’m sure why it isn’t working here. I’m really a developer so I am a little stuck.

tooltip.zip (80.7 KB)

tooltip.hype.zip (114.8 KB)

  • to access elements within a hypedocument the script should run onsceneload
  • mousemove hasOwnProperty -> clientX, clientY. pageX and pageY are not listed. though those properties belong to mouseevents it’ll should work too …
  • the absolute position of the tooltipp-element is related to its parent and not to the document

… the attached file should get you further …

4 Likes

Thanks

1 Like

@h_classen
I know this goes back aways... but I'm interested in implementing tool tips, and I am curious as to how your example works...

I'm seeing that the js runs at the very start, so it seems to be always active?

Then for the text boxes... it seems that the tooltip is detecting something about the (red)text, but I'm not sure how it is doing that. The tool tip content seems to be defined INSIDE of the of the text in each rectangle.

How was the text defined... as well as the tool tip?

I tried changing the color of another bit of the text to the same red value.... and naturally, that didn't create a tool tip...

I just found the HTML? that defines the text and the tool tips. (the little pencil icon).

I don't understand the "couponcode" class... I assume it defines the color of the text...

But for my purposes, I don't want tool tips linked to text... I want them linked to graphical elements... is there a way to adapt this off of text, and onto elements instead?

Thank you!

Hi Ryder!

I don't understand the "couponcode" class... I assume it defines the color of the text...

Yes... In the "Head HTML" (edit with button found in the "Document Inspector") You will find the styling for the "couponcode" & "coupontooltip" classes

Screen Shot 2020-12-30 at 10.02.38 PM

Screen Shot 2020-12-30 at 8.24.22 PM


But for my purposes, I don't want tool tips linked to text... I want them linked to graphical elements... is there a way to adapt this off of text, and onto elements instead?

I am thinking there is a simpler and more flexible way to meet your request without code - especially considering the nature of graphics which may have particular places for the tool tips to show up and whose locations could change depending on the graphic.

Basic idea: Group the graphic and the tool tip (in its desired location) together and use the "Mouse Over" & Mouse Out" actions in the "Action Inspector" to hide or show the tooltip when over the graphic using a (new) timeline.

In this example there is a timeline called "HideShow Tooltip" that controls the tool tip's visibility; and as You widen the browser window the tool tip sticks with the graphic in a precise location. This is accomplished in the "Metrics Inspector" in the "Flexible Layout" section for the entire "Group". Note the pins on left, top, and right.

tooltip_JHSv1.hype.zip (19.6 KB)

2 Likes

That's a brilliant idea...

One aspect to Tool Tips is that they typically delay before becoming visible (you don't want things flashing all over the screen just because you are moving your mouse across the UI...)

Experimenting with the example you provided... you can easily accomplish this by just pushing out the keyframes of the timeline.

Such an elegant example!

But now, if I understand this fully... doesn't this mean that if I had, say, 50 UI elements that needed Tool Tips... that I would have to create 50 separate timelines?

Thank you!

So if You wish to have a large number of elements as your example (50) then we will need to abandon the timeline approach and dip our toe in to the waters of JavaScript.

As it is New Year's Eve (and into New Year's weekend) I will not be doing a full explication at this time but am providing an example of Tool Tip by code using the visual set-up from my example timeline where You have a graphic object and associated tool tip that is sized, styled, placed manually and then grouped in association with the graphic object.

I understand from reading your various notes on the Forum that You are new to Hype (Welcome!). But I am not sure of your understanding of JavaScript and how it relates to Hype. So a few important points some of which You may already be aware of:

Using an ID for an element on a Scene and Layout is a "once off" proposition. You can not use the same ID in different layouts for the same Scene or use the same ID in different Scenes as they are all part of the same "page" and Javascript only permits one unique ID per page.

So we will be using Classes (names). A given Class name (such as ".mySpecialToolTip") is numbered internally starting with "0" not "1". You can use the same Class name for an object in different Scenes & Layouts, but the trick is to find and the exact element You wish to target in your code. There are many examples of doing this on the Forum just search for "classes targeting elements" and You will get a lot of hits.

Here is one thread and here is another (from the Hype Extension Project).

In my Demo Hype project I do things slightly different in terms of targeting the exact element I wish that has a given class name. In the Demo the nomenclature You can use for the various elements has a very wide latitude - only the last character(s) of the element names have a precise requirement.


In my next post, probably sometime this weekend - or Monday at the latest, I will go over my Hype Demo in detail and why I made the choices I did.

So for now here is the Hype project: tooltip_JHSv3.hype.zip (61.2 KB)

And here is the function that runs the tool tip mechanism in the Demo triggered by the "Mouse Over" & "Mouse Out" events on the graphic shape:

Screen Shot 2020-12-31 at 8.02.45 PM


Happy New Year Everyone! :tada:

2 Likes

Hi Ryder!

So to preface my following comments… I see Hype as a construction kit and often there are several ways to accomplish the same goal. The approach You pick is usually based on the task at hand, familiarity with the Hype interface, and possibly skill with JavaScript. One does not need to be a JavaScript guru to utilize this valuable tool. A basic understanding of JavaScript will prove useful for a myriad of tasks that the Hype interface can not accomplish on its own or without great difficulty.

Also, I find specific systemic nomenclature to be important unless the project is dead simple involving just a few objects; in dealing with 50 objects as postulated in your post above I find this sort of discipline to be a must.

I’ve changed the Hype Demo file to a more simplified version (v4) for this explanation compared to v3 in my post above: tooltip_JHSv4.hype.zip (34.7 KB)

In this Demo:

It does not matter what the Scene name is called.

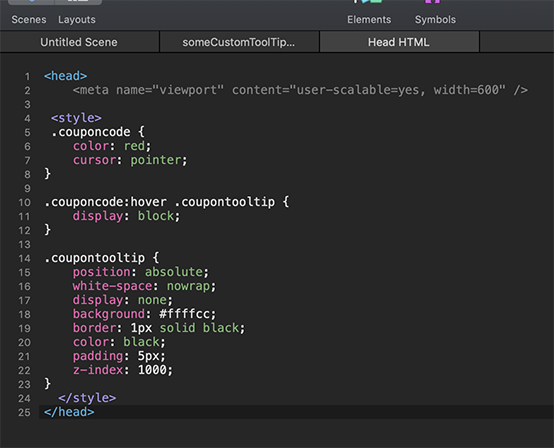
It does matter what the graphic object & its associated tooltip element classes are named with the restricting aspect being that the last two characters of these names are a match for each other e.g. “frontDoor_01” and “tooltip_01”; or “redBlanket-01” and “redblanket_tTip-01”. It is the last characters “01” & “02 etc. that will be the connecting information between the two elements. It could be letters instead of numbers if You wanted. Digits are more utilitarian for me. (Class names are assigned in Hype’s “Identity” panel.)

When a “class name” is assigned to an element it also gets an index number (i.e. [0] , [1] ) associated with it according to the layout order in the Hype “Layout” panel. The index numbers always start with “0” not “1”. You can not see these class index numbers in the Hype interface. A simplified class read out for the “Vector Shape” in the “iPhone” layout would look like “shape01[0]”. In the “Desktop” layout it would look roughly like “shape01[1]”, with the last digit in brackets being the index number for the element's class name.

======================================

Screen Shot 2020-12-31 at 8.02.45 PM

======================================

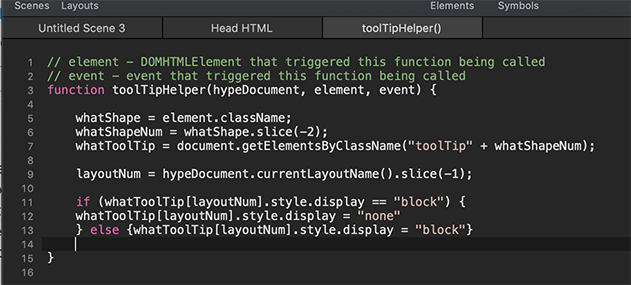
So if we look at our code we see that first we get the class name of the “element” that fires the function “toolTipHelper” via the “Mouse Over” event. “whatShape” is a “variable” that is assigned this information.

whatShape = element.className; // e.g. shape01

Next we trim off the last two digits of this class name and use it to hook into the matching tool tip. For this operation we use the slice method.

whatShapeNum = whatShape.slice(-2); // e.g. 01
whatToolTip = document.getElementsByClassName("toolTip" + whatShapeNum); // e.g. toolTip01

And finally we use the last digit of the Layout schema to quickly establish the index number for the particular class name we have identified to this point (toolTip01). We employ the same method that we did above to isolate the last digit of the current layout name - the slice method.

layoutNum = hypeDocument.currentLayoutName().slice(-1); // e.g. “Desktop_1” layout, last character = "1"


Now we have all the information we need to show or hide the matching tool tip: Class name “toolTip01” with an index number of [1] (in the Desktop layout). To accomplish this task we will employ the “if/else” conditional.

If the tooltip is visible (display == block) then hide it {...display == “none”}… else if it is hidden show it {...display == block”}

if (whatToolTip[layoutNum].style.display == "block") {
whatToolTip[layoutNum].style.display = "none"
} else {whatToolTip[layoutNum].style.display = "block"}

Note: You can use this code without alteration as long as You stick to the premises discussed above. Though it is far better to understand what is going on. For instance I took a short cut to help keep things simple for this explanation by using the layout name to establish the index number for a given tool tip class name. The two links in my previous post above discuss a more comprehensive way to accomplish this goal.

4 Likes

Awesome examples and explanation @JimScott!

1 Like