Syncing animation to fixed audio track

You can have more than one scene - just drop-in the appropriate audio track.

Not clear what You mean “Hype cannot traverse scenes natively”.

Whether for HTML or “.mp4” output I do not have trouble moving from scene to scene. You would of course need to add the audio afterwards for the video export (the audio that you synced in the Hype project).

Hype Project: AudioAnimateDemo_JHSv1.zip (76.6 KB)

Video output:

I asked in another thread if it was possible to play-on from one scene to the next in the editor and I was told that it wasn’t. It does when you preview or export to HTML or .MP4 but within the editor itself, play stops at the end of a scene. You have to go to the next scene manually, which makes syncing music across scenes difficult. Your demo (thanks, by the way) doesn’t play the second scene in the editor and the audio stops at the end of the scene 1 timeline.

Yes, You do have to Preview to see the Scene transition - as with many things in Hype a Preview is required. (So that is what You meant by “natively” - i.e. the Editor.)

If You need continuity in the Editor why not just have one scene? You can fake transitions.

I’m not using transitions but the animation is quite complex and breaking it down into manageable chunks (scenes) keeps me sane(ish). I will try copying and pasting my scenes into one long timeline near the end but I am used to doing animations in FCP so I will probably do my syncing there. Thanks for your help.

You can use a "Group" as an organizing tool instead of Scenes. When the "Group" folder is collapsed none of the animated properties will show - keeping the timeline from being overwhelming.

Then You can click the "eye" icon (on the Timeline layers) for a Group's folder to remove the Group's contents from the Stage - which cuts down the visual clutter in that regard.

These features allow you to display on the Timeline or Stage what You want at any given time.

I've worked with a single Scene having over 10 "Mini Scenes" with 120+ elements including video, audio, images, graphics, text, symbols, etc. and managed to avoid insanity with this approach. All was organized into discrete logical units. Please see the below screen shot.

Okay, groups. How can I convert my ten scenes into groups on the same timeline? Copying and pasting a timeline seems to just create a duplicate scene.

Basic idea:
Let’s assume four Scenes “1”, “2”, “3” & “4”. Scene “1” will become the Master Scene. Scenes “2”, “3” & “4” are Secondary Scenes. We will “Group”, “Copy” the elements from the Secondary Scenes, and then “Paste with Animations” in the Master Scene.

Example:
Select the elements from Scene “2”; group them and name the group with a naming scheme that works for You; select this group and choose “Copy” from the “Edit” menu.

Go to Scene “A” place the playhead at the appropriate time location on the “Main Timeline” and choose “Paste with Animations” from the “Edit” menu.

Repeat these steps for the other Secondary Scenes.

This is the general idea. Since I am not privy to all the permutations in your project, there possibly will need to be tweaks to this basic process to accommodate your project’s set-up.

Note: What I am suggesting above is not how I built my example shown in my previous post with the “Mini Scenes”. I created that Scene from scratch - not by copying & pasting other Scenes.

If this approach presents too many issues for whatever reason the exporting of individual scenes to “.mp4” and assembling in FCP as Daniel suggested in his post above would be a fallback; but of course everything is in pieces which You were trying to avoid to begin with.

Many thanks Jim. That works well. ;?)

1 Like

This has been bothering me for a while, as well. But I think I came up with a simple workaround. I had created my soundtrack in Logic, and wanted to animate a character speaking the vocals. So I took a screen grab of the Logic track along with the timeline readout. I opened that PNG in Preview and lined it up underneath my Hype project so that the Hype timeline lined up with the Logic timeline. Voila! As long as I don’t move either window, I have a clear idea of where the dialogue is and can sync it up with keyframes in Hype.

http://www.karenandjay.com/misc/hype-audio-in-timeline.jpg

@jducharme
Hi Jay!

You also might find this thread useful:

Thanks, Jim! I’ll give that a try.

Jay

You can create your markers in FC, export the project to QTP (w/o video), then extract the marker track and save it as text. It will give you the time position of each marker. This can be used to set keyframes. There are most likely other factors that could screw up the sync, but this is one way to track the timing.

1 Like

I use text-highlighting in our interactive storybooks build with Hype and used an audio-editor (like Pro Tools) where I switched the timeline to 30fps. Got the start- and end-timecode of a selected syllable and used this info to animate this in Hype. It’s a lot of work, but doable.

I whipped together a little demo of my method for frame-by-frame animation synced with a pre-made audio track:

https://youtu.be/rNak7xBZKPU

Hi Jay!

You can create an audio track waveform visual in Hype for your animation~lip sync needs.

Hype Demo Project: JayDemo.zip (386.6 KB)


Steps for syncing an existing audio track into Hype:


1) Using “QuickTime 10” I did a Screen Recording of my audio editor playing the track.


2) Trimmed mouse movements that were part of setting up the Screen Recording - leaving just the portion where the audio is actually playing.


3) Save this QT file (named “JaySnd3.mov” in the Demo) and import into Hype. We don’t care this is a “.mov” file because it is just used for reference in the lip syncing.

In the image below we are looking at a Screen Capture from the Hype Interface showing the matchup between the QT file “JaySnd3” and Hype’s timeline.


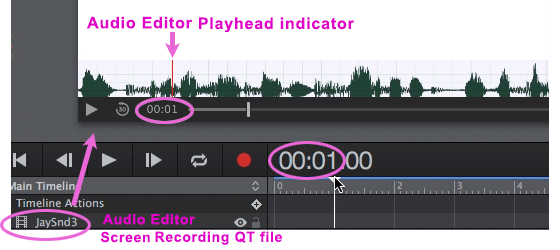
_A screen recording in the Hype app showing the sync between the timeline & the audio track:_

Hi Jim. You had mentioned this in an e-mail you sent me. I tried it. But when I processed the wave file in QT, it got horizontally compressed and I couldn’t re-stretch it back to its original size. I tried using it anyway and when I brought that MP4 file into Hype, I didn’t place it on the stage but on the timeline, where it appeared as a series of still frames (as it would in a movie editor). Placing it on the stage showed it in its compressed form, making it useless.

The file you attached does seem to work, so I must be doing something wrong. I’ll keep playing around with it. Thanks!

Okay – I got it to work. The capture is a bit finicky; I found it trickier to line the audio up precisely in Hype. I have to bring the QT capture into Final Cut to get the exact start and stop points, rather than rely on QT’s cruder trimming. But once it’s accurately rendered, it does make things a bit easier. Thanks again!

1 Like

I recommend buying QT 7 Pro from Apple and using that instead of the more recent versions. It has all sorts of capabilities that were taken out of later versions. As Apple tries to force users to use the newer versions, I moved QTX to the Applications > Utilities folder, then set all pertinent files to open in QT7 rather than QTX. I can then save, extract, insert audio tracks, output to various formats / codecs / screen sizes, and do whatever.

Hi Trey!

I've been using QT Pro since 2005 - it is still one of the best editors I've used, and am still using (as I mention in Post #3 & 14 in this thread) such as adding waveforms to an audio track using the "Add to Selection and Scale" command - one of the most valuable editing functions I've ever encountered.

QT Pro 7 Referenced in Post #14:

Sorry. I thought your post said QuickTime 10.