Tutorial:
Step 1: Gather Your Font Files
Start by gathering all the font files that you want to embed in your Hype document. These fonts should be in WOFF2 format (and/or WOFF format in some cases). Keep them handy for the next steps.
Step 2: Create a styles.css File
In your preferred text editor, create a new file and save it as "styles.css". This is where you'll declare all your font files.
Step 3: Write Your Font Declarations (or copy /paste and edit them)
In your styles.css file, write your @font-face rules to declare your fonts1. A typical declaration looks like this:
@font-face {
    font-family: 'YourFontName';
    src: url('YourFontFile.woff2') format('woff2');
    font-weight: normal;
    font-style: normal;
    font-display: block; /* swap is also possible */
}
Make sure to replace 'YourFontName' with the name you'll use for the font in your CSS, and 'YourFontFile' with the actual filename of your font file.
You can also get this declaration from some vendors in the web fonts packages they offer. Make sure to copy and paste only relevant information and keep the path to only the file name of the font (no subdirectories etc.). Do this for all the fonts that you want to embed.
Step 4: Import Your Fonts and CSS into Hype
Next, open your Hype document. Navigate to the Resource Library and import all your font files and the styles.css file you just created. To do this, click on the "+" button at the bottom of the Resource Library, choose "Add Files...", and then select your font and CSS files. They should now appear in your Resource Library.
Step 5: Link to Your CSS in Hype
Once your files are in the Resource Library the style.css should automatically be linked in your Head HTML, else make sure the checkbox in the resources library is set to "include in document <head>".
Step 6: Apply Your Fonts in Hype
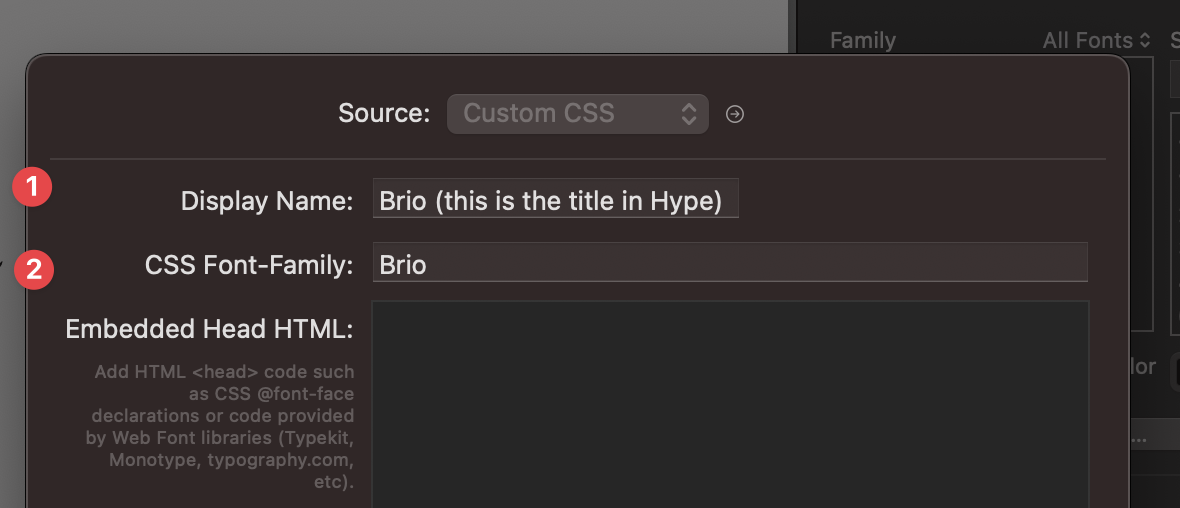
With everything set up, you can now use your fonts in Hype. Just go to the Typography section in the Element Inspector, and in the Family dropdown, select "Custom CSS...". Then, simply enter the font name you want to display in Hype ❶ and the the font name as declared in your CSS file ❷. Leave "Embedded Head HTML" empty!2. Do this for all the fonts that you want to embed.
And that's it! This approach makes it easy to manage your fonts, particularly when you have multiple font files, because everything is centralized in your styles.css and your Resource Library. If you want to add or change a font, just modify your styles.css file and reimport it to Hype.
Here is an example setup with a single font. You can add as many as needed.
Alternative-way-of-managing-fonts.hype.zip (78,7 KB)
1If you need to add more compatibility, you can add formats like woff or ttf, but most modern browsers don't need those, so I often skip that redundancy.
2This is the beauty of this approach: a centralized file to manage all your fonts in styles.css without the need to add the resources' folder path etc.