Hi to All!
I’ve recently been working on a process to bring motion graphic-style sequenced PNG files into Hype in a relatively painless manner - currently an awkward procedure.
This is not a sprite sheet approach as I am targeting a significant quantity of large images (compared to a sprite sheet); in this example: 600px x 400px, 182 images = six seconds @ 30fps… with an eye to working with even more images of this size - or slightly bigger.
The idea here is to leverage the capabilities of motion graphics programs that can easily create complex graphics effects - and augment the production capabilities of Hype: Green screen, natural phenomena (fire, smoke, clouds, etc.), sophisticated masking & reveals, sound based animation, “video” interactivity, 2.5D effects - the list can go on. The motion graphics program I use is “Motion” from Apple (US$50).
The “Particle Emitter” component of the topic heading relates to the fact I have only experimented with Particle Emitter graphics in the process I am going to describe - it could be there are aspects for other imaging styles that will require adjustments to the process~code that follows below.
For those not familiar with Particle Emitters:
Particle Emitters are standard tool in motion graphics. In a nutshell: think of a garden hose (the emitter) and the water droplets flowing out as the particle cells. These cells are under discrete finite control in terms of color, shape, size, acceleration, and duration. Not only do the cell particles move but so can the emitter. You can generate hundreds of these particles in short order.
The forte of Particle Emitters is creating realistic organic particle forms such as smoke, water, fire, pyrotechnics, etc. The kind of output which is currently difficult~impossible to create using standard web technologies. Emitters can also produce standard graphic output as well, such as particle cells based on photographic images, or almost any kind of graphic really.
In the video demo that follows the next two graphics, I opted to slow down the “billowing cloud” PNG sequence which gives it a more gelatinous textured appearance. It is relatively simply to match the PNG sequence timing to that of Hype’s Timeline. All other animation is created with standard Hype procedures.
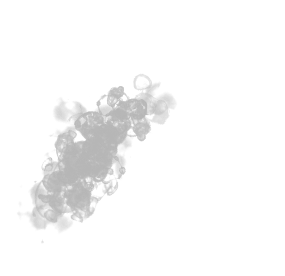
Frame 33 out of 182: The billow is opaque~translucent~transparent as it evolves, here seen on a white background.
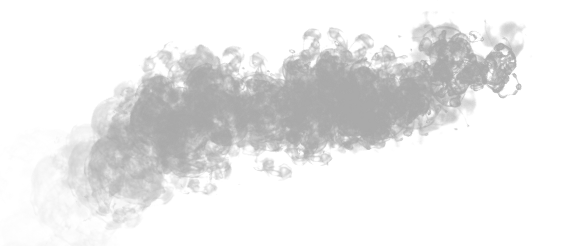
Frame 71 out of 182:
Demo Video Snippet - browser screen capture.
Method
Hype has a few deficiencies when it come to handling image sequences in significant quantity:
-
You can not import them automatically in a linear fashion (one after the other at a given time rate) into the Timeline. The alternative is manual placement - obviously not practical for a large number of short duration images.
-
The Resource Library does not currently allow a Folder~Directory schema so a large number of graphics~images is very unwieldy. One suggestion - use the Automator app to rename your files with a starting prefix such as “zz” (which also has other advantages to be discussed further down). This prefix will pretty much guarantee all your other files will be located above this group. You will not need to access these files manually again (i.e. dragging to the Timeline layers column).
-
You can not select a group of images in the Resource Library (which I’ve always been baffled by). If for whatever reason You need to change out your images in volume go through the “Show Package Contents” route (by control, or right-clicking, the Project file; and remove & replace the images (keeping the names identical) manually. Make sure the Hype project file is NOT open when You do this operation.
Also all PNG files have been run through the amazing “ImageOptim” app ( https://imageoptim.com/mac ).
The average reduction in image file size was around 88% on my PNG files. Because of the nature of these files, soft and amorphous, I allowed a slight lossy compression. I could not tell the difference compared with the originals.
My trial Hype project file uses the following approach: Only one image needs to be placed in the Hype Animation pane (the “Stage”), using your basic image tag:
<img src="${resourcesFolderName}/smoke_1000.png" width="600" height="400" id="imageSeqHolder">
The following code works by swapping out the image source for this image for another in the sequence; basically this initial image serves the longer term function of being an image sequence holder. You do not need to place any images in the Timeline’s layer column.
function pngAnimation(hypeDocument, element, event) {
    var imageNum=1000; // number of 1st image
	var imageNumLast = 1182; // number of last image
	var sequencer = setInterval(function() {imageSequence()}, 100);
    // higher numbers = slower animation (fps decreases)

	function imageSequence() {
		if (imageNum > imageNumLast) {
			clearInterval(sequencer);
		}
		else {
			  $("#imageSeqHolder").attr("src","${resourcesFolderName}/"+"smoke_"+imageNum+".png");
  // "smoke_" is adjustable prefix name
 // optional placement here of a "z-index" splitter which could place images above and/or below a target element

    			  imageNum++;
    			 }
    	}
    }
Nothing is written in stone here - the early stages of experimenting. I typically use specific prefixes for each image sequence grouping to keep things coherent. Different prefixes will mean the current code~function would have to be adjusted for each running sequence. This approach will be upgraded so it uses the prefix in what ever is presented to this function as the first image in the sequence. I use a starting number of 1000 because it will allow JavaScript to augment the image sequence numbers easily.
I’ve also yet to experiment with other options such as:
• An optional “z-index splitter” (currently just commented in the code) to sequence the images behind or in front of existing elements on the Hype Stage - on the fly.
• Adjusting the size of the image holder, as needed, also on the fly.
