Here is a link to a Hype template (by @michelangelo) that offers some of the features You are looking for (just swap out images for text blocks) - at the minimum it will be an instructional example:
I’ve only gotten some text changed from the Survey Legend sample and added an overlay on button press (however it does not close and back to where I left off).
Tried to create a new document (suggested by DBear) for scrolling, but it just doesnt work! URGGH… Total newbie, hope some kind soul can point me on the mistakes I made.
Thank You for having examples and descriptions of what You are looking to achieve.
One reason You may not have gotten more replies to your questions might be to answer all of them would take some time - and then of course your additional follow up questions to proposed solutions to the problems.
So why don't we take things in smaller bites and maybe others will be more likely to take on a question also.
Since I'm going first I'm going to pick the easiest one ;-> (for me).
When You say "disappear" I am assuming You want the animation to fade out quickly, but not instantly. You will be able to adjust this fade out time to your own needs in the JavaScript code in the Demo project.
The animation consists of two rectangles moving up and down repeatedly. The two rectangles are in a Group called "Animation Group". This Group has an ID of "animationGroup". (You assign the ID name in the "Identity" Panel, using the field: "Unique Element ID").
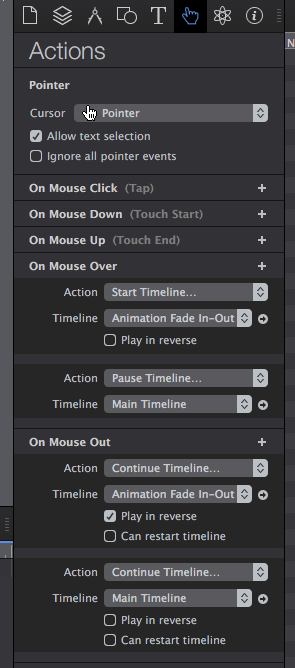
In the Hype "Actions" panel: "On Mouse Over" & "On Mouse Out" are assigned to the "Text" box (element). These event handlers call the JavaScript function "animationDisappearToggle()".
I assumed if You had the animation disappear when the user moused over the "Text" box that you would want the animation to reappear when the mouse was moved out. If not then simply remove the "On Mouse Out" handler for the "Text" box.
The JavaScript code has the word toggle in the function name because the function toggles the opacity of the "Animation Group" (whose ID is "animationGroup" which in turn is assigned the variable name "animGrp"). If it is "100%" opacity then it is set to "0%" opacity; or if the opacity is "0%" it is set to "100%".
"If" the opacity of the group is 100%: if (visibleToggle == 1.0)
then the animation ("animGrp") is faded out over a time period of 1.0 seconds to an opacity of "0"; with an "easeinout", and the timeline pauses.
If you wanted it to fade out to "0" opacity over 2.5 seconds instead, the code would look like: hypeDocument.setElementProperty(animGrp, 'opacity', 0, 2.5, 'easeinout')
"Else If" the opacity of the group is 0%: else if (visibleToggle == 0)
it is faded in to 100% over 1 second and the animation resumes. hypeDocument.setElementProperty(animGrp, 'opacity', 1.0, 1.0, 'easeinout');
(Note: An opacity of "1.0" in the code represents 100%; ".3" would be 30%, etc.)
So the user moves the mouse over the "Text" box, the animation fades out and the timeline is paused; the user mouses out of the "Text" box and the animation fades back in and resumes playing from the time where it was paused by the mouse over event.
The singular JavaScript function that does all the work:
function animationDisappearToggle(hypeDocument, element, event) {
    var animGrp = hypeDocument.getElementById('animationGroup');
    // the variable "animGrp" is assigned the value of the element id 'animationGroup'

	var visibleToggle = hypeDocument.getElementProperty(animGrp, 'opacity');
	// the variable "visibleToggle" is assigned the value of the "animGrp" opacity

	if (visibleToggle == 1.0) {  // if the opacity of the "Animation Group" = 100%
	hypeDocument.pauseTimelineNamed('Main Timeline');
	hypeDocument.setElementProperty(animGrp, 'opacity', .35, 1.0, 'easeinout')
	}
	else if (visibleToggle == 0) { // else if the opacity of the "Animation Group" = 0%
	hypeDocument.setElementProperty(animGrp, 'opacity', 1.0, 1.0, 'easeinout');
	hypeDocument.continueTimelineNamed('Main Timeline', hypeDocument.kDirectionForward, false);
	}
}
The above example used only JavaScript. The example here in this post uses only Timelines to achieve the same effect. It is very simple to create, but you need to pay attention to the various settings for the Timelines in the “Actions” Panel and in the “key frames” in the Timelines themselves (please see screen capture examples below).
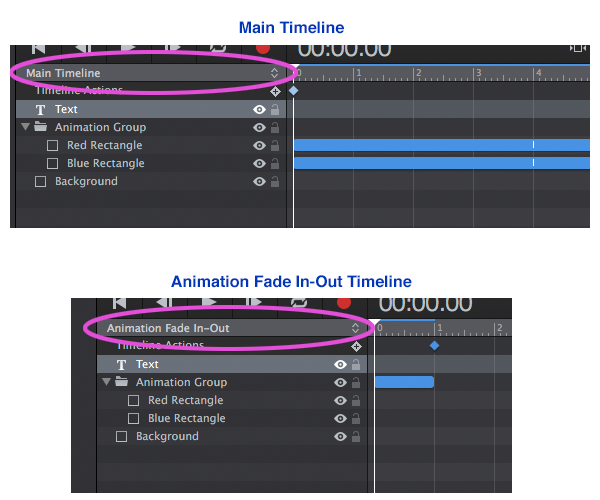
In this example we have two Timelines: the default “Main Timeline” plus one called “Animation Fade In-Out”.
The “Main Timeline” controls the animation going up~down, and the “Animation Fade In-Out” controls the (surprise!) fading in & out of the animation when there is a “On Mouse Over” or a “On Mouse Out” event.
The overall effect is the same as for the JavaScript example: the animation goes up & down and fades~in out depending on the mouse event. The “Main Timeline” is paused “On Mouse Over” and resumes “On Mouse Out”.
I’ve created these two versions to show that You can create the same effect using different tools~approaches. Which one to use will depend on what your overall goals are in your presentation - and of course You can use JavaScript code You write in conjunction with Timelines.
This project uses the Timeline only to create the effect.
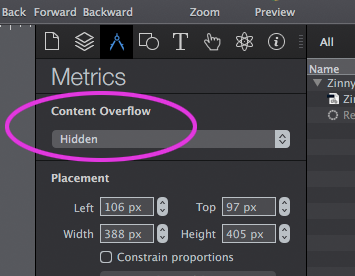
The key here is to create a group, with the content You wish to zoom inside the group; then set the group's "Content Overflow" to Hidden in the "Metrics" panel - as per the screen capture below. This set-up is your basic mask.
I used the "Scale" property to increase~decrease the image size. Please also note I move the top of the image down while the image is scaling to keep the head full in view at the end of the scaling.
This is mainly a JavaScript solution with the JavaScript calls being made by the "On Scene Load" & "On Scene Unload" event handlers in Scene 1. (There are two scenes total in the Demo.)
When the document first loads:
In the "Head HTML" we initialize the global variables "timelineMarkerScene1" & "timelineMarkerScene1Direction". These global variables set:
The time in the timeline to "0". ("timelineMarkerScene1").
The direction of the timeline to "Forward" ("timelineMarkerScene1Direction").
The JavaScript function _"sceneOneReturn"_ runs when the "Scene 1" loads.
_(see Hype's "Scene" panel, near bottom: "On Scene Load"; also see image at very bottom of this post)._
As previously mentioned when the document is first opened the value of "0" is set for the time in the timeline and the direction of the timeline is set to "forward" (global variables "timelineMarkerScene1" and "timelineMarkerScene1Direction" respectively).
When the "On Scene Unload" handler runs for Scene 1 (i.e. "function timeMarkerScene1") both the time in the timeline & the direction of the timeline are recorded in the global variables: "timelineMarkerScene1" and "timelineMarkerScene1Direction".
So, say we click to go to Scene 2, and when we leave Scene 1 the timeline is at "00:03:15" and the direction is "reverse". These values will be recorded in to the global variables as described just above. When we click in Scene 2 to return to Scene 1 the values stored in the variables will be used to set the time & direction of the timeline to what they were when we last left Scene 1.
**Screen captures of the "Scene" panel - Top & Bottom**
I’ve gone back to the first example (since my client prefer that one) and adding in the “return to previous scene timeline position” example. It somehow gone haywire.