I’ve been trying to understand what the capo tool does, but no luck so far. Not much info either; I read the entry in the documentation and saw a [video on youtube] (https://www.youtube.com/watch?v=7ZQv-RlQk-M) but I couldn’t understand what it adds to the table: Regarding the video tutorial, it seems to me that there was no need to set the capo at all; the record tool would suffice. No?
Could somebody elaborate a bit on what the capo tool does?
This has given me some lead on how to use the capo tool in simple scenarios.
I guess the name has also to do with the capo in guitars that helps you transpose a chord, but still it's a bit fuzzy - so any help is appreciated.
So rephrasing @Luckyde's answer (trying to fit it in my head at this late hour), one could say that the capo is the way of choosing where the new tween begins, by automating the creation of keyframes for all the affected properties.
Yeah the capo tool is literally just
Start animating the property you want at the current frame you’re on.
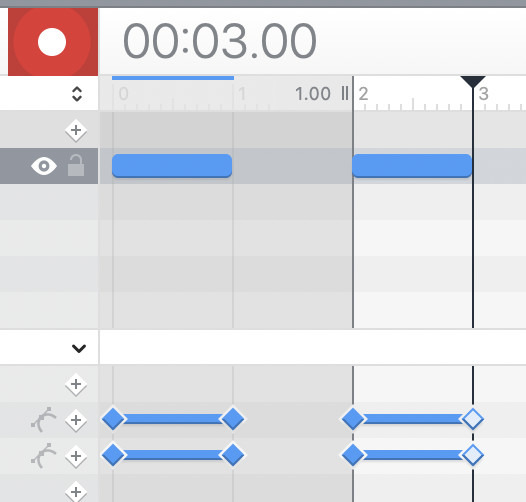
So e.g.
In the first go i just turned on record and changed the colour at 2 seconds, and it inbetweened between them.
On the second i did the same thing but before i went to 1 second in and turned the capo on so it inbetweened between frame 1 and 2.
This way there are clear breaks between keyframes its not a continuous motion and you can control what happens when easier.
I can give my more complicated examples, but in essence its for control. e.g. I want character’s opacity to go from 0 to 1 at 5 seconds in, then i want at 6 seconds rotation to go from 0 to 180 and at 7 i want left to go from 0 to 100. By turning the capo on and resetting it for all 3 you can do all of the above. OR as an alternative you can animate like normal and then drag they keyframes around the timeline but i find that becomes more tedious depending on what you’re doing.
Thank you @Luckyde so much for both your examples!
I think I understand better now: Seems that the big benefit of using the capo over manually setting the starting keyframes, is when you have to animate multiple properties simultaneously; you get to save multiple clicks on the Add keyframe button () by simply setting one capo and letting Hype the work for you!
It just helps set the start time of animations made via the Record tool.
Without the capo, all new animations made via Record would start at 0 and you'd always have to manually adjust them to start when you want.
Similarly, if you recorded a property change after an existing keyframe, then you'd only get one new keyframe. The capo allows for a "gap" by setting an additional starting kefyrame at the capo position.